
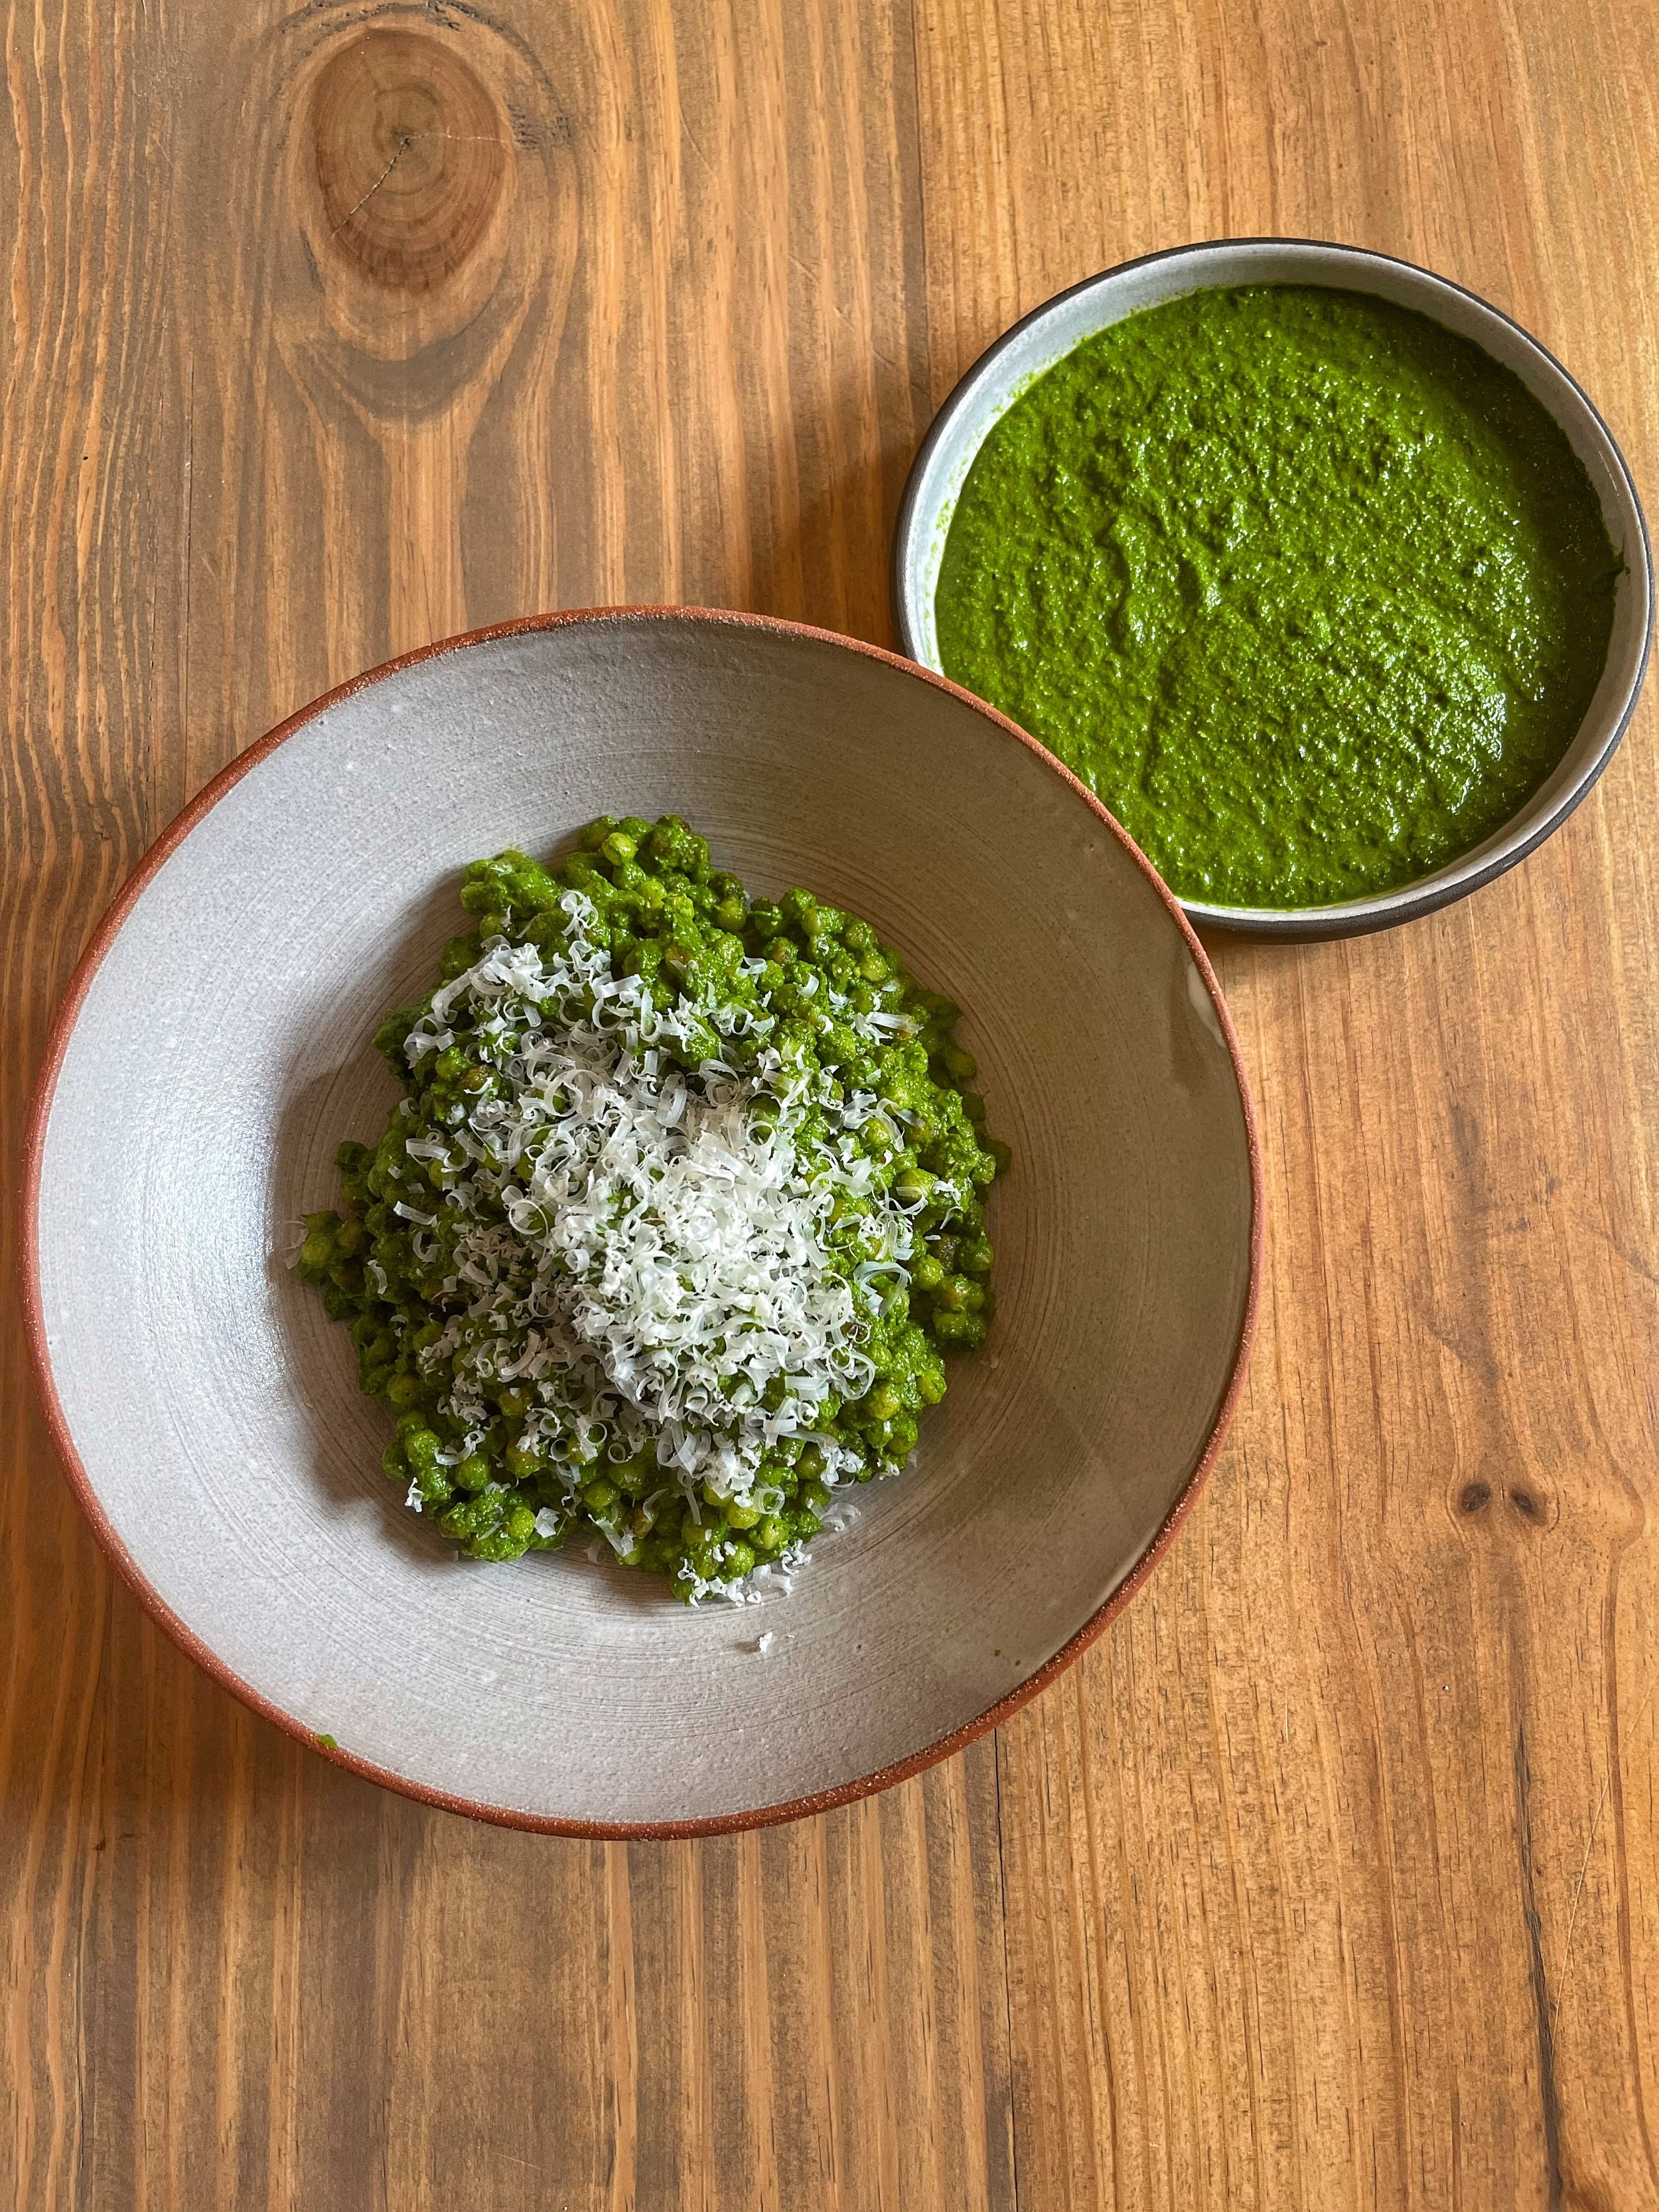
Fregola Sarda with Verde Sauce
In late spring, I was tasked to create a pesto. The only problem was that basil is not traditionally available in the farmers markets in New York City until mid-summer. There is, however, an abundance of kale and herbs such as dill, mint, chives, and parsley. And so this riff off of traditional pesto was born.
We’re in the full swing of summer now, but all the ingredients I used for that late-spring pesto are still available today. It’s a sauce that spans the seasons and is too good not to make immediately. It pairs particularly well with fregola (a pasta similar to Israeli coucous) because it’s hard to overcook and has a great texture. You can serve the pasta hot but if you serve it cold, as a salad, the nutty wood-fired flavor from the fregola really shines through.
1 (about 17.6-ounce) package
medium fregola sarda
1 tablespoon
plus 1 cup extra-virgin olive oil, divided
1 medium bunch
flat-leaf kale (about 6 ounces)
1 large bunch
fresh chives (about 2 ounces)
2 small or 1 large bunch fresh parsley
1 medium bunch
fresh dill (to get 2 ounces coarsely chopped fronds and tender stems)
1 large bunch
fresh mint (to get 2 ounces picked leaves)
6 bunches
fresh tarragon (about 3 ounces)
1 ounce
Pecorino Romano cheese, plus more for garnish
4 medium lemons
1/2 cup
water
2 teaspoons
kosher salt, plus more for the pasta water and as needed
4 cloves
garlic
1 teaspoon
Calabrian chile flakes or red pepper flakes (optional)
2 tablespoons
unsalted pistachios (optional)
INSTRUCTIONS
Bring a large pot of heavily salted water to a boil over medium-high heat. Add 1 (about 17.6-ounce) package fregola sarda. Cook, stirring occasionally, until al dente, 10 to 11 minutes. Meanwhile, line a rimmed baking sheet with parchment paper.
Drain the fregola. Transfer to the baking sheet, drizzle with 1 tablespoon of the olive oil, and toss to coat. Spread out into an even layer and let cool to room temperature. Meanwhile, prepare the verde sauce.
Prepare the following, adding each to the same large bowl as you complete it: Strip the leaves from 1 medium bunch flat-leaf kale; discard the stems and coarsely chop the leaves. Coarsely chop 1 large bunch fresh chives (about 2 cups). Pick the leaves from 2 small or 1 large bunch fresh parsley until you have 2 1/2 cups. Coarsely chop the fronds and tender stems from 1 medium bunch fresh dill until you have about 2 cups. Pick the leaves from 1 large bunch fresh mint until you have 3 cups. Pick the leaves from 6 bunches fresh tarragon until you have 3 cups.
Finely grate 1 ounce Pecorino Romano cheese until you have 1/2 cup.
Finely grate the zest from 4 medium lemons until you have 1/4 cup. Juice the lemons until you have 1/2 cup. Place the lemon zest, lemon juice, remaining 1 cup extra-virgin olive oil, 1/2 cup water, 2 teaspoons kosher salt, 4 garlic cloves, and 1 teaspoon Calabrian chile flakes if desired in a blender. Blend, stopping and scraping down the sides of the blender as needed, until combined, about 30 seconds.
Adding the kale and herbs to the blender in batches, blend, starting from low speed and increasing to high speed and scraping down the sides of the blender as needed, until combined. Add the Pecorino and 2 tablespoons unsalted pistachios if desired, and blend until smooth and combined, about 1 minute.
Transfer the cooled fregola to a large bowl. Add 2 1/2 cups of the sauce and mix until combined. Taste and add more sauce or kosher salt as needed. Serve topped with more grated Pecorino.
RECIPE NOTES
Make ahead: The verde sauce can be made up to 1 day in advance and refrigerated in an airtight container. Press a sheet of plastic wrap directly onto the surface of the sauce before sealing the container to keep it from browning. The fregola can be cooked up to 2 days ahead and refrigerated in an airtight container.
Storage: Leftovers can be refrigerated for up to 1 day, the color will darken slightly.

Carta di Musica
Carta di Musica
Sheets of Music
Some of you already know but for those who don’t Carta di Musica or Sheets of Music flatbreads are my thing to make. Carta di Musica is a Sardaian flatbread made with semolina & all purpose flour. They are also vegan! I’ve spent years trying to perfect these amazing flatbreads and they appear on almost every dining menu I put together these days. They are super versatile for any sort of toppings you are into or just great to munch on alone. Just like anything you do in the kitchen for the first time, these flatbreads may seem a bit overwhelming to make but I promise you after a couple of go’s you will get the hang of it. Give it a shot and I hope you all enjoy!
Makes about 13 long/large crisps
1 3/4 Cups All Purpose Flour
1 Cup Semolina Flour
1 ½ teaspoons Kosher Salt
1 Cup Water
¼ Cup Extra Virgin Olive Oil
2 -½ Sheet Trays (18x13)
Semolina flour for dusting
Preheat oven at 450 degrees
1. Place your 2 sheet trays into the oven while you’re prepping this recipe.
2. Whisk flours and salt in large mixing bowl to incorporate evenly
3. Slowly whisk in water and olive oil until it forms a shaggy dough
4. Scoop dough out of bowl onto a lightly floured countertop, using semolina flour.
5. Gently knead the dough for about 2 minutes. All we are trying to do here is form a smooth ball that is workable. Add more semolina flour if the dough ball is sticky.
6. After your dough ball is smooth and formed, gently roll the dough into a fat long log and cut into 13 equal portions using a dough blade or a regular knife. Anything will do that you have around. Form each portion into little dough discs.
7. Cover your dough with a kitchen towel to prevent drying out.
8. Now, it’s time to roll out the dough discs. Take your time and don’t rush. It may take some time to get the feel of the dough. You will get the hang of it! Lightly dust your work surface and place 1 disc down. Press down using your hands to make a flat large disc as evenly as possible. It’s very important to have the dough even as they cook very fast in the oven.
9. The next step is to roll out the dough as long, round, evenly and as thin as possible with a rolling pin. Flour is your friend during this process. If the dough feels sticky, add a dusting of semolina flour to the disc and the rolling pin.
10. While you’re rolling out the dough, be gentle. Use your hands after a few strokes of the rolling pin to stretch the dough a bit and add more flour if needed. Relax and take your time.
11. Continue to roll out the remaining discs. If all 13 look the same, great! If not, who cares, they will still taste great.
12. Time to bake. Carefully remove your hot sheet trays from the oven and with your hands gently lift the dough and place onto your sheet tray. You should be able to bake 2 doughs on a sheet tray at a time,4 total. But if you want to only bake 1 at a time, go for it. Place back into the oven.
13. The dough should cook pretty quickly so keep an eye on them and don’t walk too far away. After 2-3 minutes, take a peek. The flatbread should be browning and also puffing up a bit.
14. Flip your crackers with a thong and continue to cook until the second side is browned evenly. There may be some darker spots or even some burned spots during the baking. It’s better for the flatbreads to be a bit darker than pale because they won’t crisp. But after some practice and getting into the rhythm of the things, it won’t be an issue and you will soon become a master of Carta di Musica.
15. Remove crackers from the oven and place on a rack to cool. Continue the process until you have completed all 13 flatbreads.
16. After they are cool, place into an airtight container. They should stay crisp for about a week.
Panelle
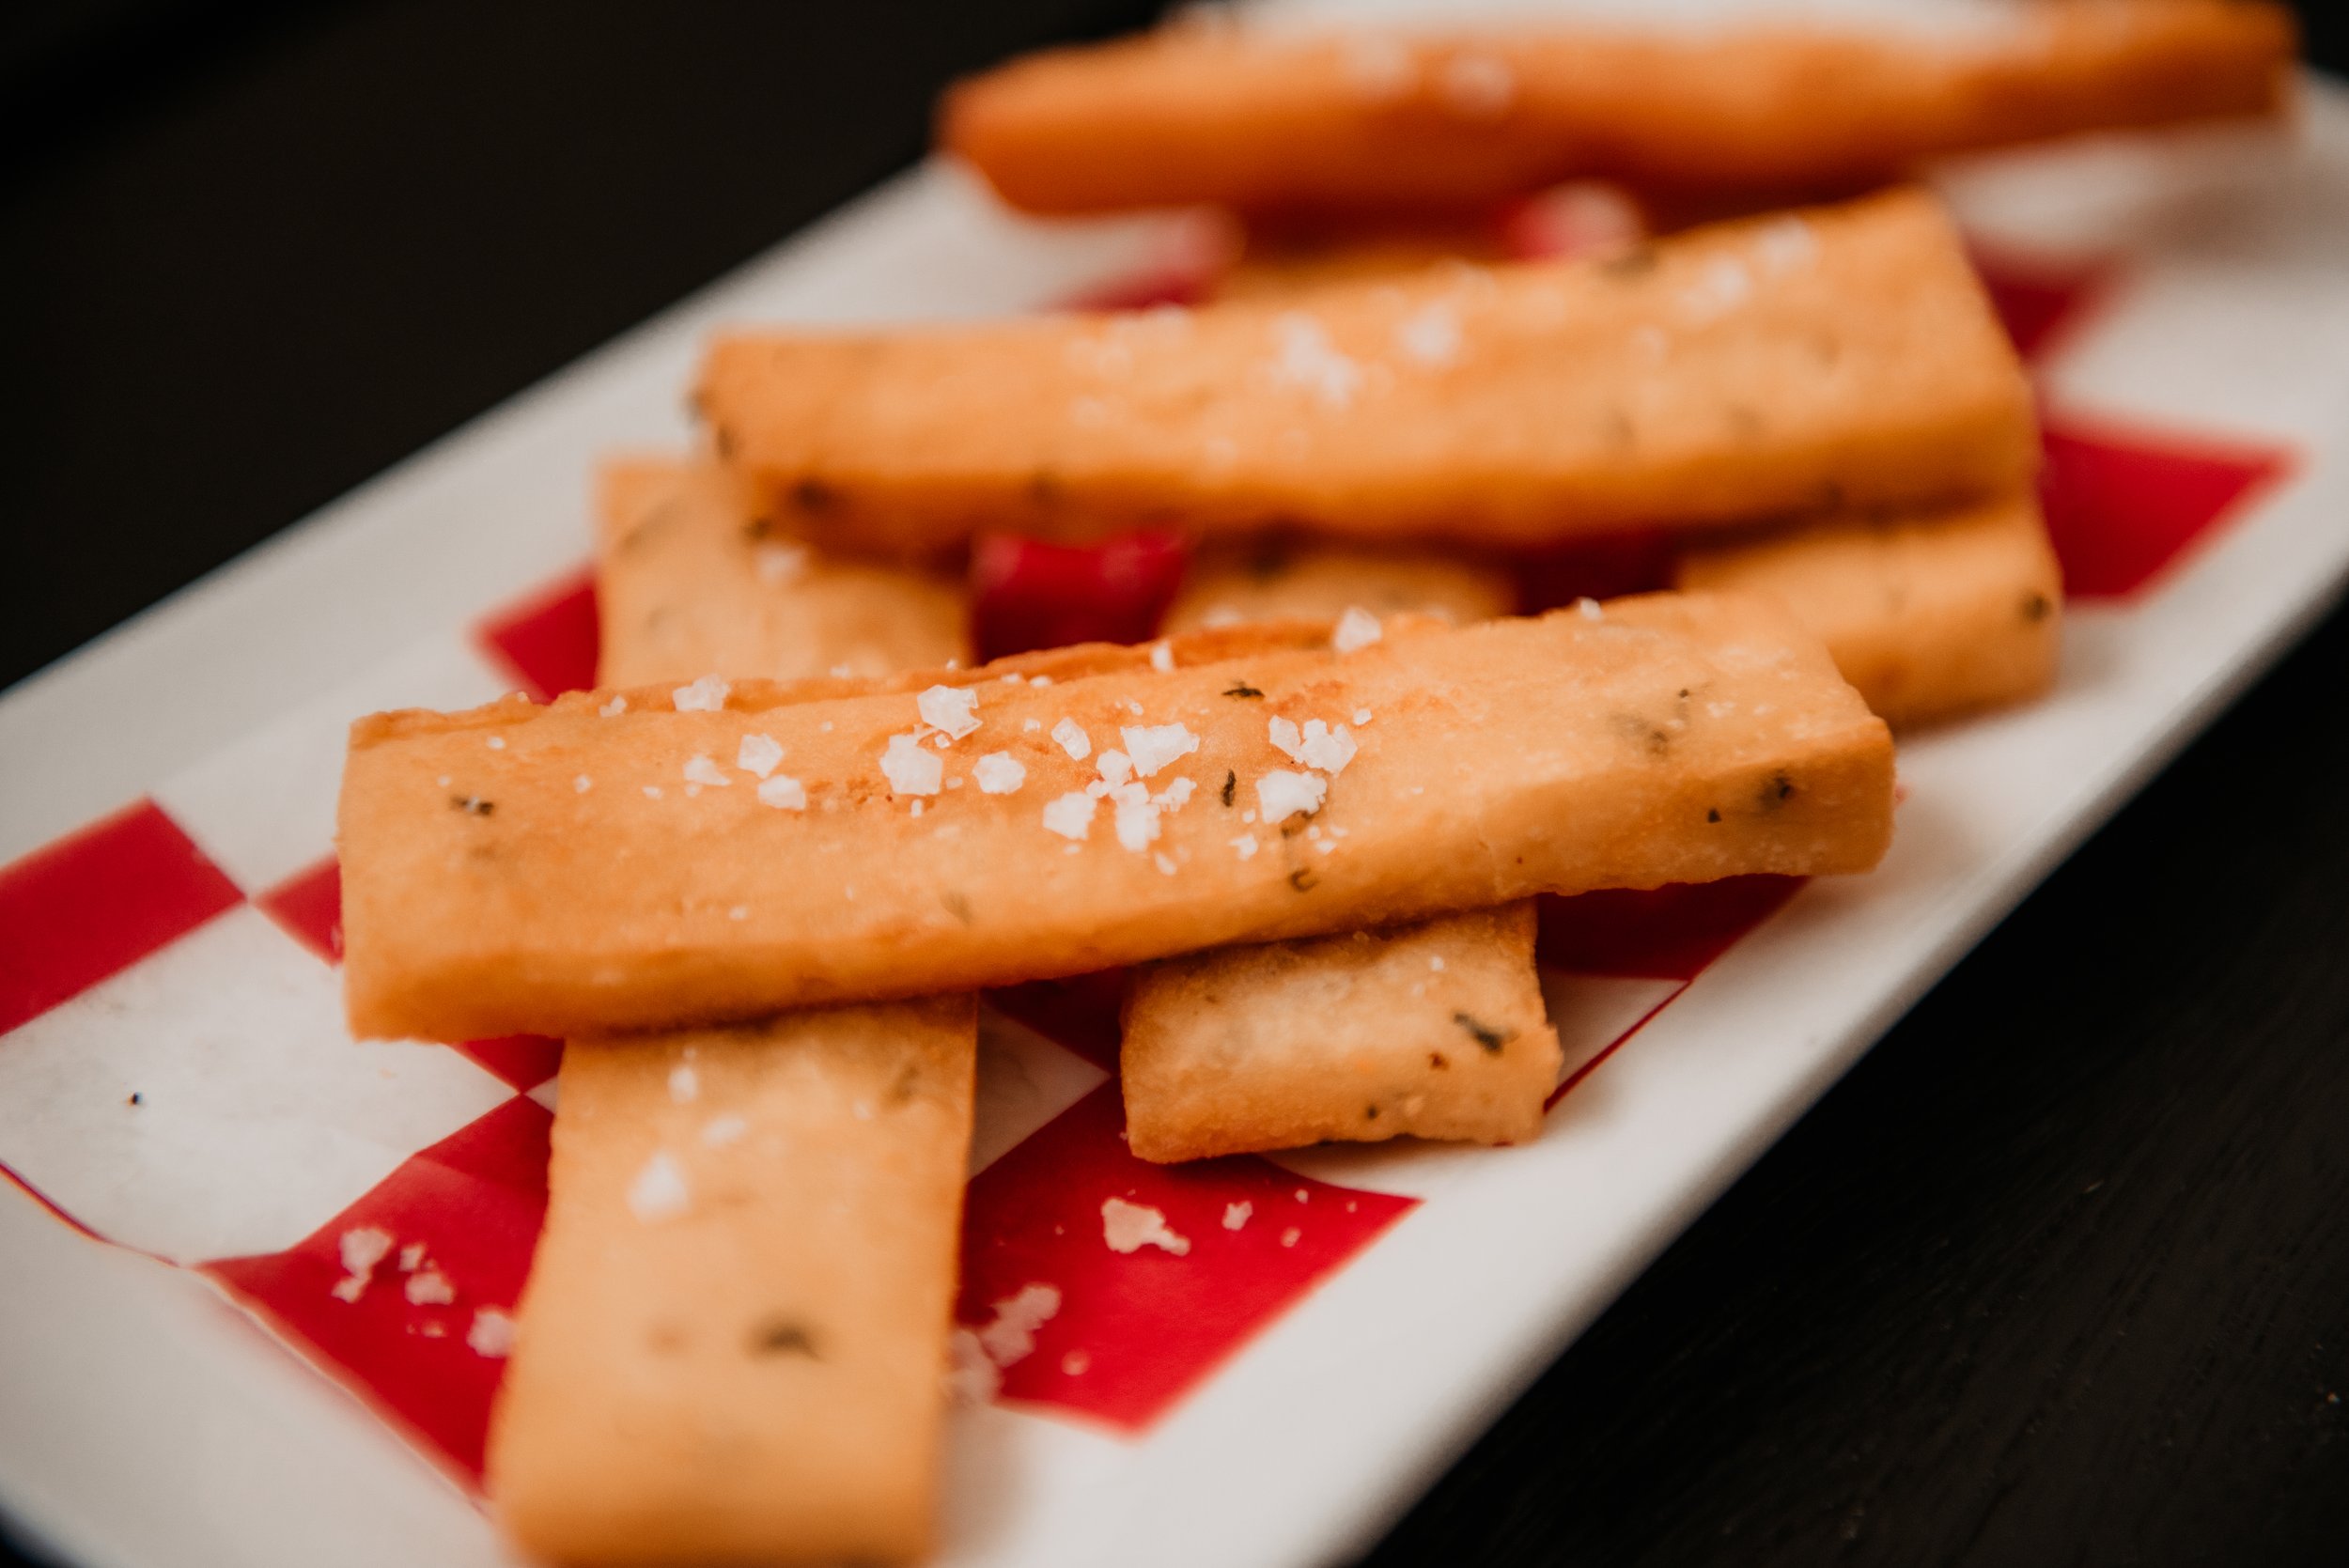
Panelle
Sicilian Chickpea Fries
Serves 2
2 Cups Water
1 TBL Extra Virgin Olive Oil
1 Cup Chickpea Flour (garbanzo bean flour)
1 TBL Chopped Parsley
Salt & Pepper, to taste
1 Quart Vegetable Oil
Fry Thermometer
Quarter sheet tray or 8x8 baking dish
Whisk
1. Place 2 cups of water and 1 TBL of Extra Virgin Olive Oil into a medium sized pot and bring to a boil.
2. When water comes to a boil, add your chickpea flour and whisk your mixture until combined, lower the heat on your stovetop to low heat. (Simmer)
3. Continue whisking the mixture for about 5 minutes. There shouldn’t be any lumps and mixture will be thickened and slightly pulling away from the sides of the pot. Add salt and pepper to taste and the chopped parsley.
4. Pour your chickpea mixture onto the sheet tray and spread into an even layer. I like to cover mixture with plastic wrap and run a small towel across the plastic wrap to ensure the mixture is spread evenly and smoothly.
5. Refrigerate for at least 2 hours, preferably 12hrs. Chickpea mixture should be firm to the touch.
6. Place vegetable oil into a large skillet or medium sized pan and heat to 350 degrees, using a fry thermometer for accuracy.
7. I like my chickpea fries thick like a potato steak fry and cut them into 4 inch strips in length and 1 inch thick in width. But feel free to play around with your shape!
8. In small batches, fry your strips for about 4 minutes or until golden brown and crisp.
9. Remove Panelle from the oil and onto a paper towel lined plate or sheet tray with a cooling rack. Sprinkle with salt pepper and if you want a squeeze of lemon.
10. Serve on a plate and enjoy!

Gravlax
Ingredients
2lb Hudson Valley Steelhead Trout, Skin On, Pin bones removed
1 Cup Kosher Salt
1 Tsp Cracked Black Pepper
½ Cup Sugar
¼ Cup of Chopped Herbs (Tarragon, Mint, Dill)
¼ Cup of Vodka
Procedure
1.Place a large piece of plastic wrap into a baking dish that is large enough to hold the fish. After all your ingredients are mixed you will wrap your steelhead into a nice tight package. You will have to use multiple sheets of plastic to create a tight little package.
2. Combine salt, sugar and black pepper in a bowl and mix well. Then, sprinkle salt sugar mixture all over the fish (skin side and flesh side) and onto the plastic wrap.
3. Pat the fresh herbs on top of the steelhead. Pour vodka on top of your herbs and wrap tightly in your plastic wrap using several sheets.
4. Next, you will want to place something heavy on top of your package such as soup cans or a couple of heavy plates. This helps in curing the fish evenly.
5. Every day, give your fish package a flip and place weights back on top. This will distribute all those liquids evenly.
6. After 48hrs, remove fish from your package and pat dry with a clean towel.
7. To slice, lay trout skin side down and with a sharp knife, slice thinly. Enjoy!
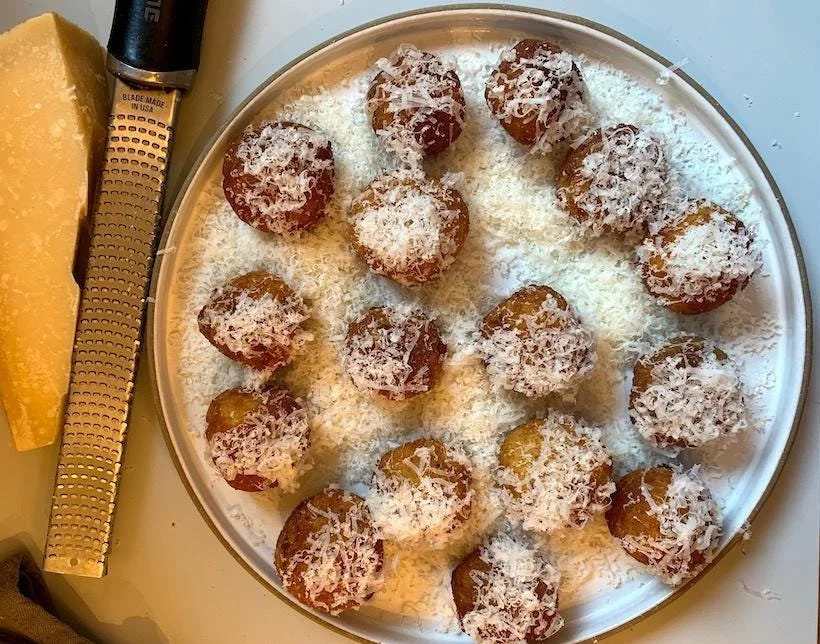
Cacio e Pepe Fritters
This fritter recipe is a play off the classic pate e choux, which is a French pastry dough to make cream puffs, profiteroles, and eclairs. But instead of baking the dough, we fry it. This recipe is all about showcasing the deep rich, nutty, slightly acidic salty taste of Parmigiano Reggiano.
I’ve also included a Parmigiano Reggiano cheese sauce recipe which is optional.
Cacio e Pepe Fritters
6 TBL (3oz) Butter
1 Cup Water
1 Cup of Flour, plus ¼ cup flour for dusting
½ tsp Salt
4 Eggs, left at room temperature
3 TBL Freshly Cracked Black Pepper
2 ½ Cups Freshly Grated Parmigiano Reggiano, plus 2 TBLS grated for garnish
4 Cups Canola Oil (For Frying)
1. In a small pot combine butter, water, and salt and place on your stove top. Over medium heat dissolve the butter in the water.
2. As soon as the butter dissolves, add your flour to the pot and set your temperature to low heat. Continuously stir your flour mixture to prevent sticking. Mixture will form into a dough ball. This process should take about 5 minutes and will cook the flour and dry out the mixture. This process will also create a hollow inside when dough is fried. The dough mixture should be soft and dry to the touch. Remove from the heat.
3. Place dough mixture into a stand mixture with a paddle attachment and on medium speed add 1 egg at a time until incorporated. After adding all 4 eggs, add the pepper and Parmigiano Reggiano and mix for another 30 seconds. Shut off your stand mixture.
4. Add 4 cups of canola oil to a medium size pot with a fry, digital or candy thermometer and wait for your temperature to raise to 350 degress Fahrenheit.
5. Meanwhile as you wait for your oil to get to the correct cooking temperature, scoop 3TBLS of your mixture into a ball and gently dust the outside with flour. This will help prevent splattering when frying and also crisp the fritters.
6. Drop 4 dough balls at a time and fry for about 3-5 minutes. You will know your fritter is ready will they begin to float and turn golden brown.
7. Remove cooked fritter and place on a tray or plate and continue to cook the rest of the dough mixture.
8. Garnish with grated cheese and enjoy
(Optional) The cheese sauce is a modernist take on the nacho style cheese (velveta cheese) you would see at 7/11 stores. The recipe is also scaled out in grams for precise measuring. Its super easy and don’t feel intimidated by the fancy salt names. You can easily purchase on Amazon. Typically, it’s made with a circulator and a water bath (sous vide) but as long as you pay attention as its cooking it can be simply made with a pot of hot water and a zip lock bag. Give it a shot!
Parmigiano Reggiano Cheese Sauce
300 grams Cubed Parmigiano Reggiano
300 grams Whole Milt
3 grams Salt
12 grams Sodium Citrate (fancy name for a type of salt)
2 grams Sodium Hexametaphosphate (another fancy name for salt)
1. In a bowl mix all ingredients and place into a gallon freezer style zip lock bag.
2. Set a large pot of water onto your stove top and bring water up to simmer.
3. Drop your bag into the water for 10 minutes or until all ingredients are melted and incorporated.
4. Remove bag from water and place into a blender. Blend until incorporated and pour into a bowl.
5. Enjoy with your fritters!
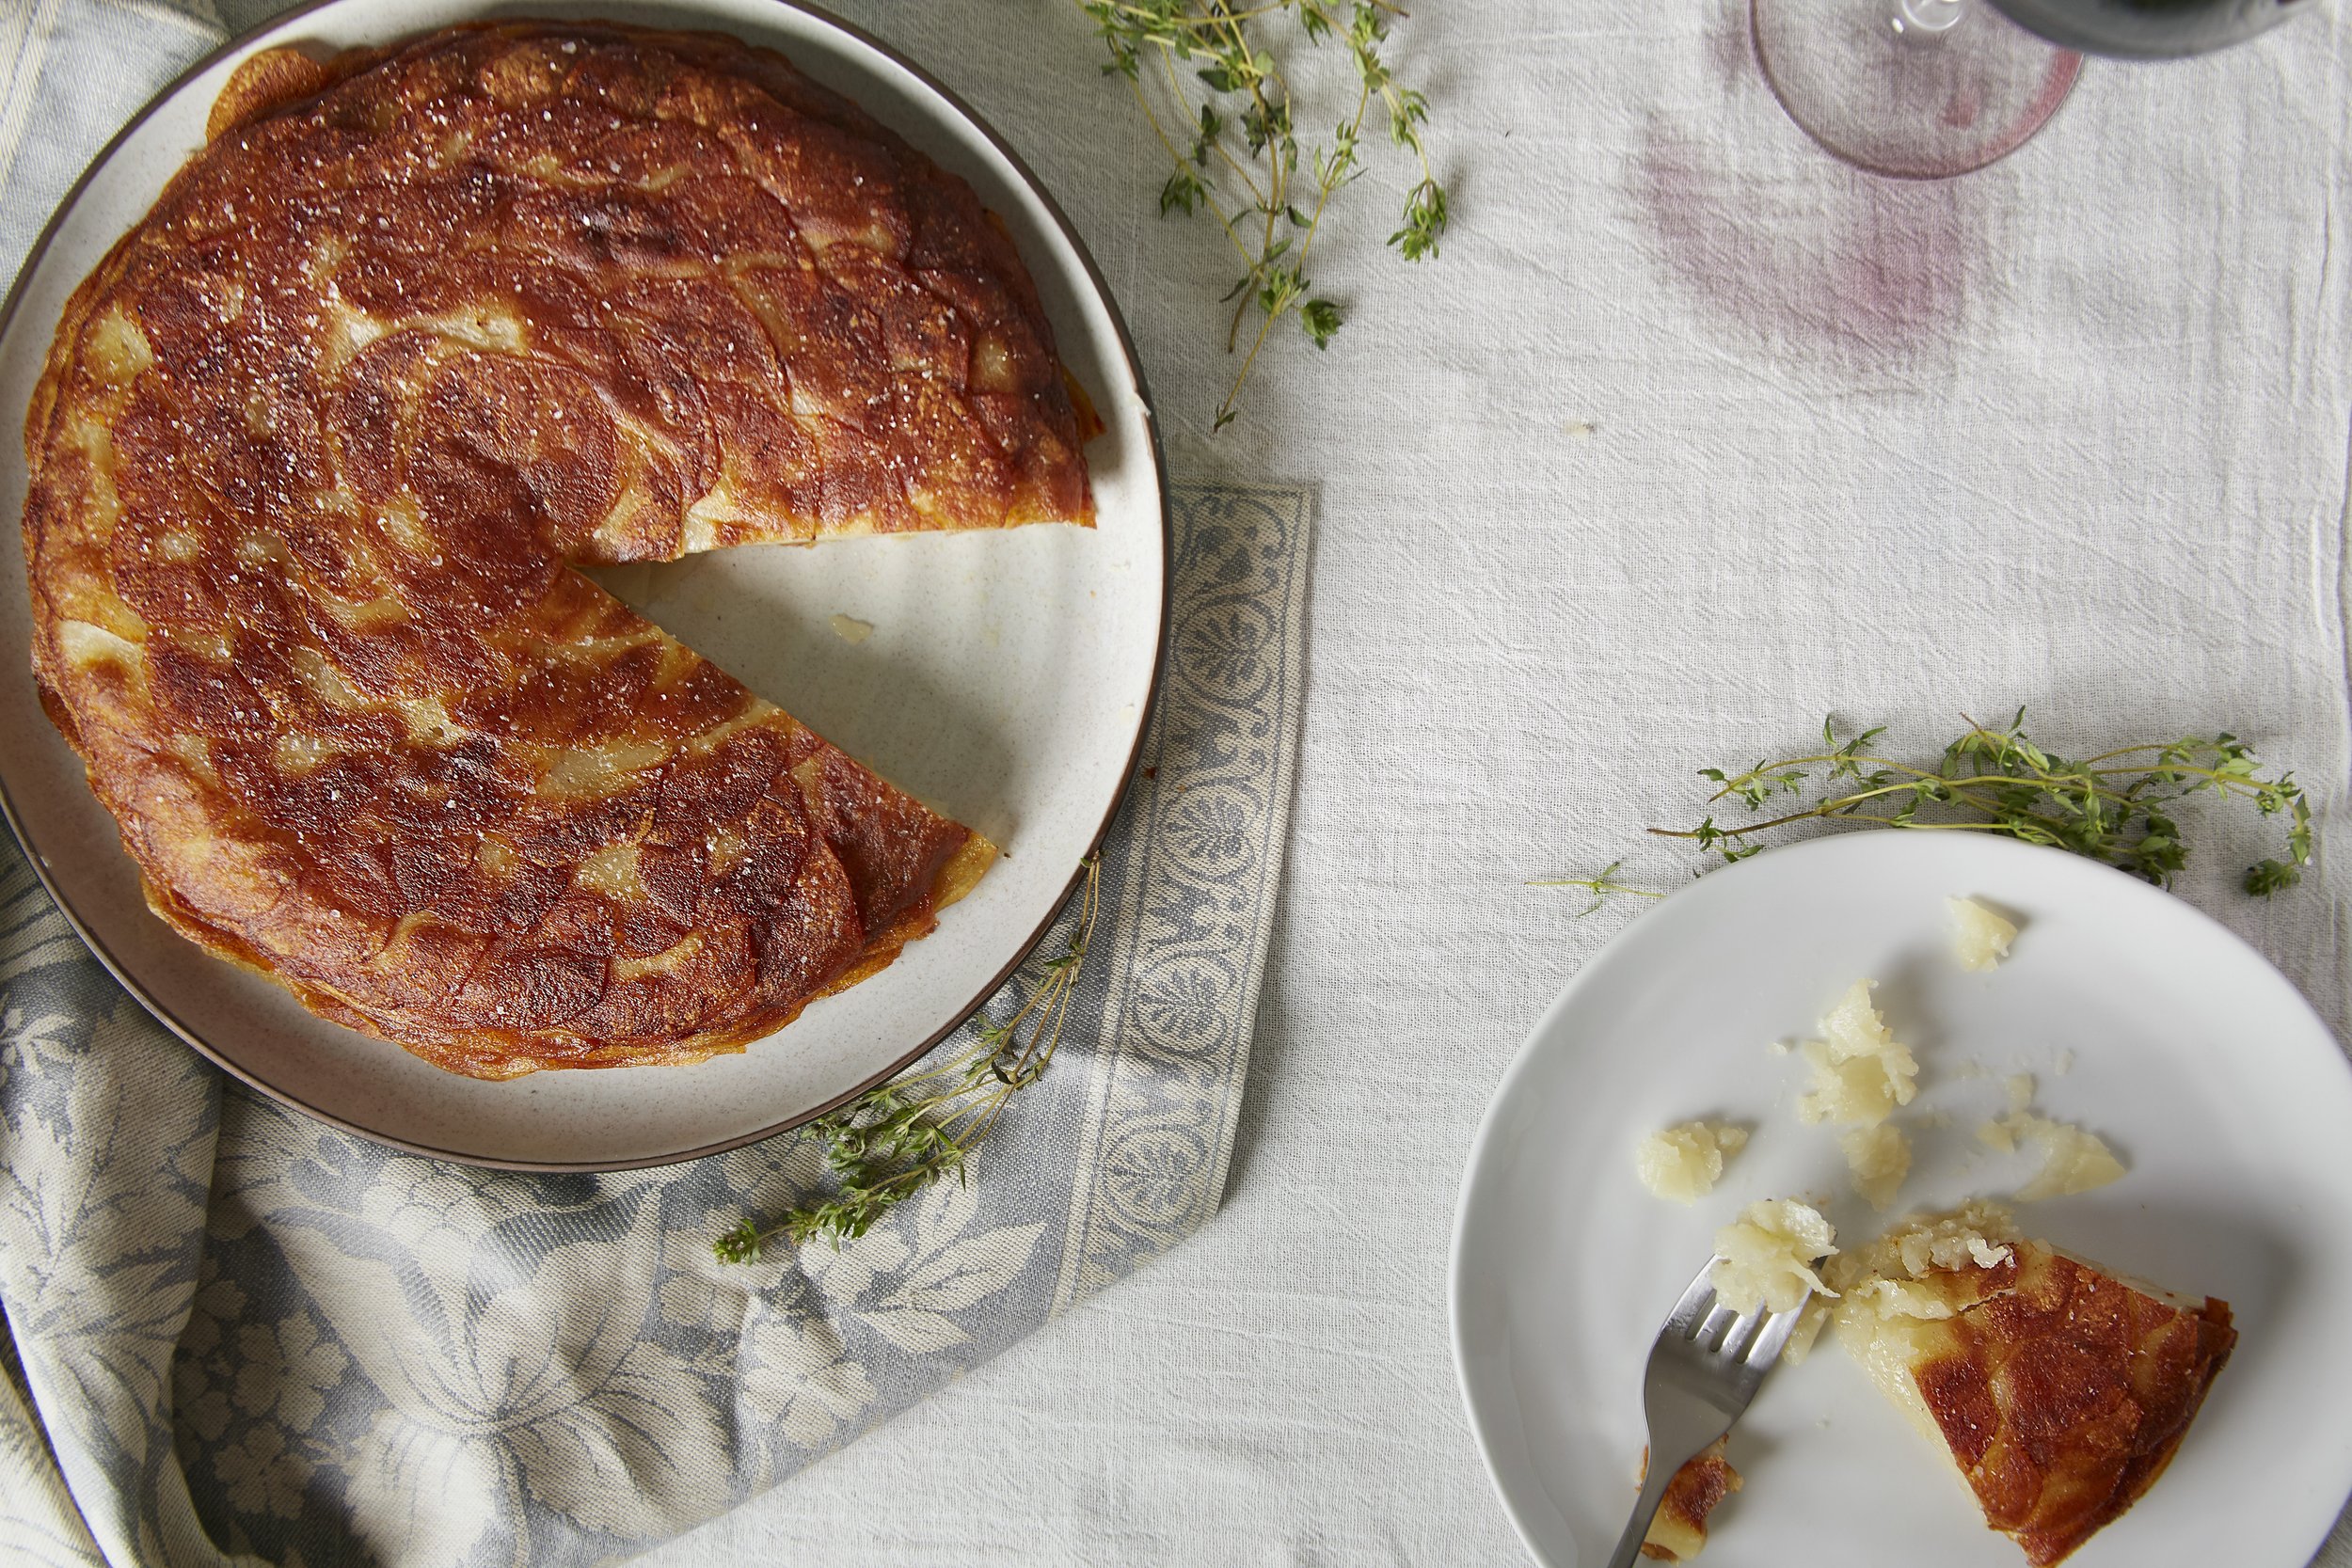
Pommes Anna
The ultimate Potato dish, Pommes Anna consisting of layered potatoes that are crisp on the outside and soft and creamy inside.
Pommes Anna
3 ½ lb Idaho Potatoes, Peeled
½ cup Extra Virgin Olive Oil or Melted Butter
Salt & Pepper to Taste
1 Tsp Picked Thyme for Garnish
Tools
10” Sardel Skillet
Vegetable Peeler
Japanese or French Mandoline Slicer
Procedure
1. Pre heat your oven to 375 degrees
2. Slice your potatoes using a Japanese or French mandoline slicer to about 1/16 of inch thick. The potato slices should be very thin but not paper thin.
3. Place your skillet on the stovetop at medium heat with ¼ cup of your olive oil or melted butter. The skillet should be fully coated with an even layer of olive oil or butter. This will ensure that your potatoes are evenly crisp.
4. Place your hand about 6 inches away from the pan and if you feel the heat on your hand, you are ready to begin placing your potatoes in the skillet.
5. Place your first potato slice directly into the middle of the pan. Starting at the top begin placing the potatoes and creating a circle around the first center circle. Continue clockwise and place the next potato slice about halfway overlapping the center potato. Place the third slice so it overlaps the first and second slice and so on. You will begin to create a decorative circular pattern by layering the potatoes as you continue to place the slices down until you reach the edge of your pan. At this point, you will begin a new layer by placing your next potato slice into the center of the pan. Repeat the whole process.
6. Continue the process by seasoning every other layer with salt and pepper to taste. Add a splash of olive oil or butter and press down on the potatoes with a spatula. This will help bind the potatoes and steam inside each layer as its cooking and create a creamy interior. Shake the pan every so often so rotate the oil/butter at the bottom of the pan.
7. When you have finished your layers, add the remaining butter or olive and give your potato a good press. This will ensure a nice structure and place into the oven.
8. Bake for about 10-15 minutes until you see crispy edges throughout the potatoes.
9. Remove from the oven and turn the Pommes Anna over, bottom side up on a tray with a cooling rack.
10. Cool for 45-60 minutes to allow the potatoes to set. Cut the Pommes Anna in half, then cut into quarters and then cut the quarters into halves. This will create 8 even slices.
11. Garnish with salt, pepper, and thyme.

Brined & Roasted Chicken
This month, our recipe is a Brined & Roasted Chicken. It’s great for a midweek meal and doesn’t require much prep time. If you are not familiar with brines, brining is a technique to season and tenderize uncooked meats by a saltwater and sugar solution. Adding fruits, herbs and spices helps to flavor your meat. This process will also help crisp your chicken skin and give it a nice caramelization from the honey in the brine. Even if you overcook your bird a bit, it should still be tender and juicy.
If you do make this recipe, I'd love to see your creations! Feel free to tag me in your photos on Instagram (@chefcava) or email them to me to share. You can always email me questions too.
Hope you enjoy, and I'll see you soon!
3-4lb Whole Chicken, tied or untied
1 Gallon Water
1 Cup Kosher Salt
1/3 Cup Honey
Zest & Juice of 1 Orange
2 Bay Leaves
4 Crushed Garlic Cloves
Handful of Black Peppercorns
3 Star Anise (optional)
5 Juniper Berries (optional)
1 Stick of Cinnamon (optional)
5 Cloves
Procedure
Place your chicken into a bowl , container, tub or whatever you have that will fit your brining solution comfortably and will also fit into your fridge.
Combine all ingredients into a pot , EXCEPT YOUR CHICKEN and bring to a boil. Boil for 2 minutes and remove from the heat and cool liquid.
Strain your cooled liquid over the chicken until its totally submerged.
Place your container into the fridge for at least 12 hours and no more than 24.
Remove your chicken from the fridge and from the liquid. Discard the brining liquid. Place chicken onto a lined sheet tray, baking dish or cast iron pan and leave at room temperature for about an hour. Leaving at room temperature will help the chicken cook more evenly.
Pre heat your oven to 375 degrees while your chicken is sitting out.
After an hour, place your bird into the oven, preferably using the center rack. After 30 minutes, check the temperature of your chicken by placing a meat thermometer into the thickest part of the thigh. Be careful not to touch the bone , as it will give you an incorrect read. Internal temperature of a cooked chicken is 165 degrees. I would pull the bird from the oven when it reaches 160. Your bird will continue to cook after its removed from the oven
Let your chicken rest for at least 15 minutes. You want all those amazing juices from your bird to re distribute and settle.
We are going to go through carving a bird. At first, it can seem like an impossible task, and it ok if it’s not perfect. After a few roasts and practicing carving you will eventually start carving without even thinking about it. You got this!
To carve, place your chicken onto a cutting board with the legs facing you. I like to remove the legs first. Gently pull the legs away from the body and guide your knife through the joint. Now slice through the opposite leg joint. Now that the legs are off, slice through the joint of the drumstick and thigh. It is a soft tissue joint and just guide your knife through it. Place your legs and thighs on a plate. Note: on the backside of the chicken where the legs where taken off the back there is a piece of meat called the oyster. It’s a tiny little succulent piece of meat. Pop them out and onto a plate with the legs.
Next, let’s remove the wings. Pull the wings down away from the breast and guide your knife through the joint pulling down. Repeat on the other wing and set them on to a plate.
Finally, remove the breasts. Take your knife and set it as close to the side of the breast bone and slide your knife down through the cartilage until it is removed. Now do the other side.
You did it! Arrange your chicken pieces onto a plate and enjoy!
